
Is Microblading Painful in DC? Compare It With a Tattoo

The comparison isn’t as simple as asking which hurts more. Most people rate microblading discomfort between 3 and 5 on a 1-to-10 scale, and topical numbing is typically used. If you’re wondering whether microblading is painful in DC, expect some discomfort, but not one sensation or pain level that applies to everyone.
It’s reasonable to compare microblading with a regular tattoo before booking. Both involve the skin, but the experience varies, so a single pain rating can’t predict how either will feel. Understanding how numbing works and what to expect during the appointment is more useful.
This guide compares microblading discomfort with tattooing, explains when numbing cream may be applied, and outlines practical ways to prepare. It also covers aftercare and safety considerations during healing, helping you make a more informed decision.
Table of Contents
1. How Does Numbing Cream Work for Microblading?
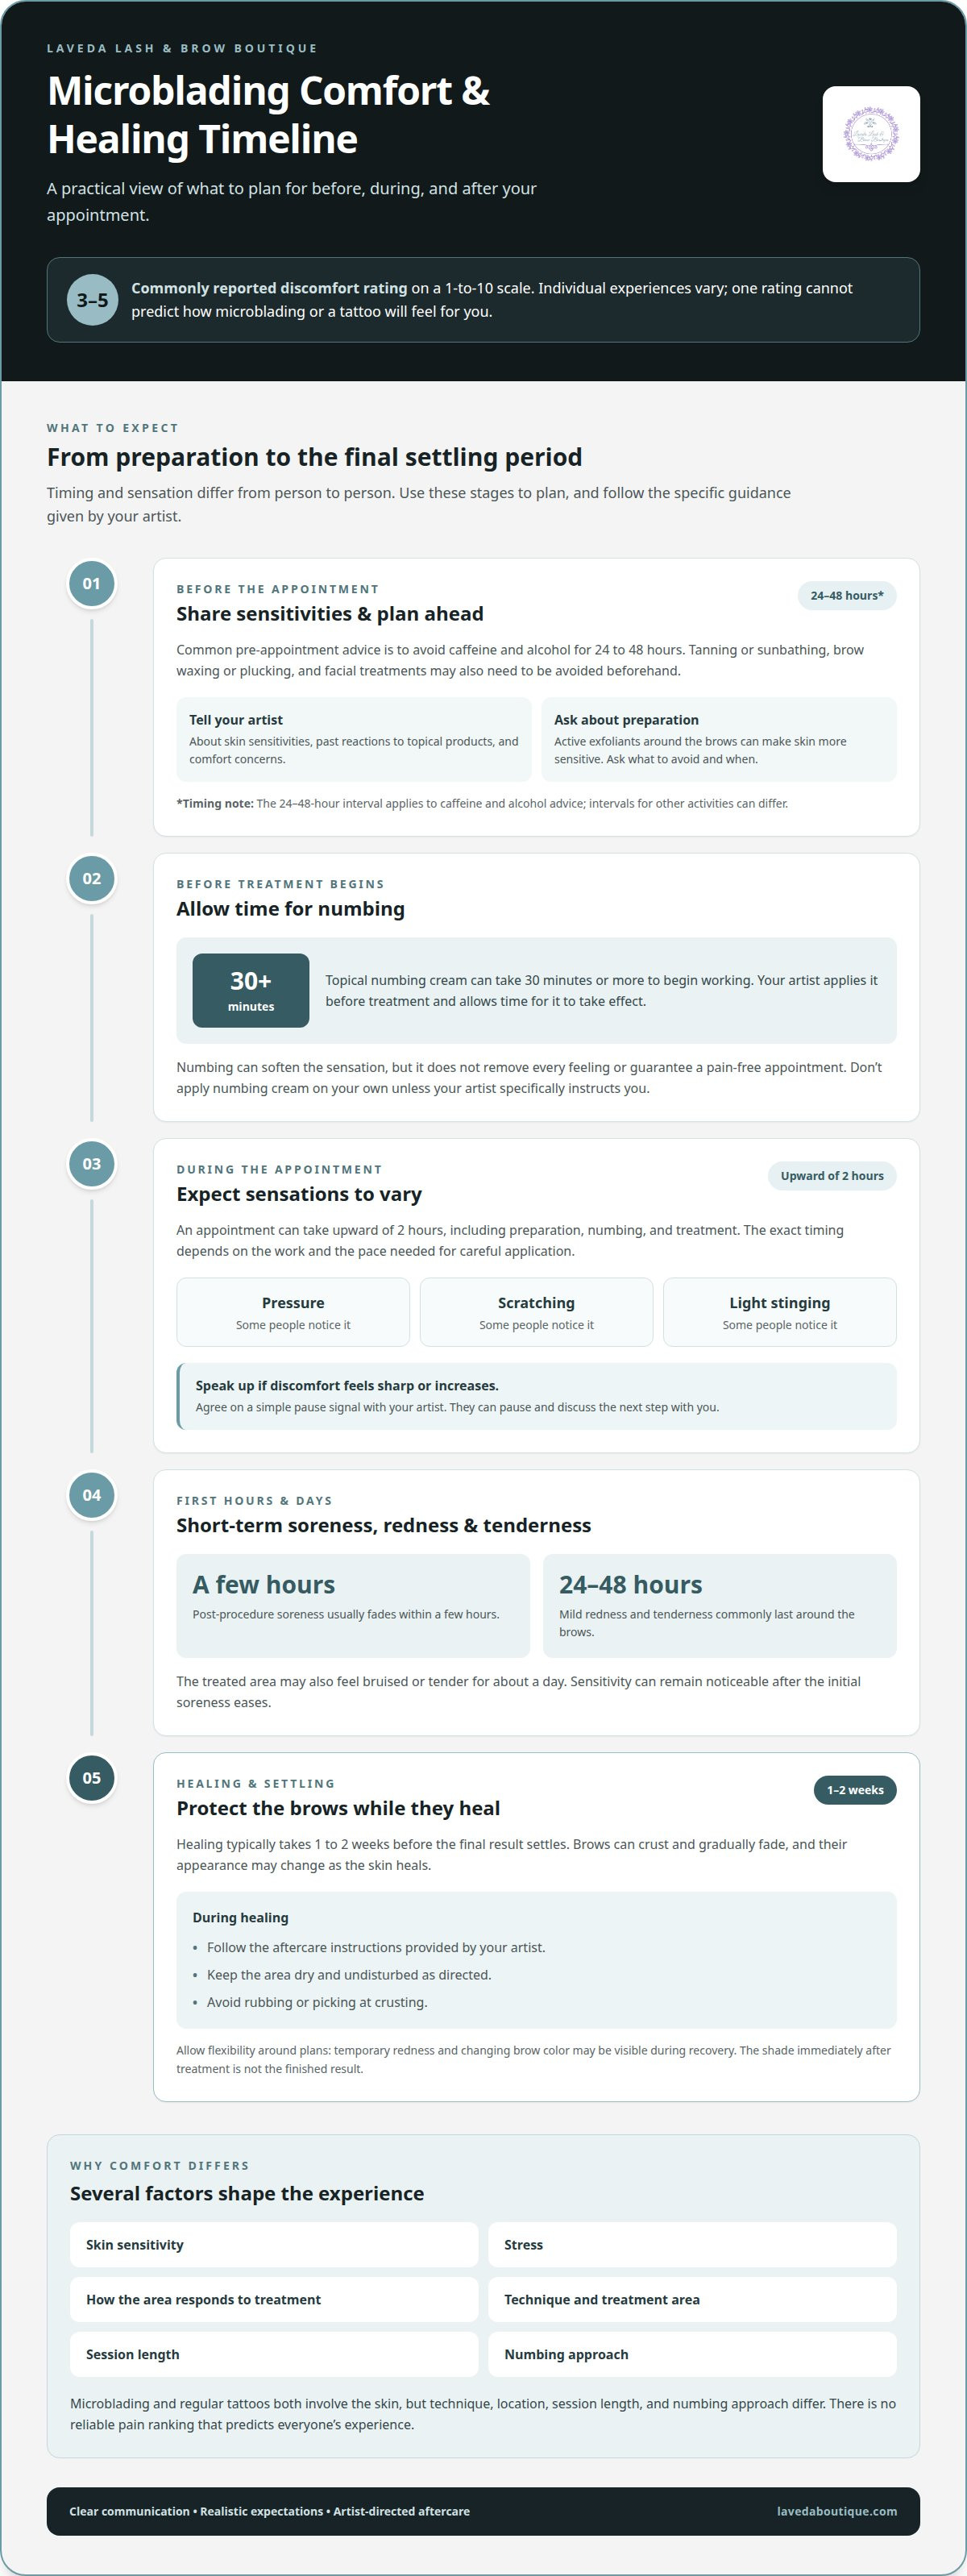
Microblading uses fine strokes that penetrate the skin, so some sensation is expected. Topical numbing cream is typically used to reduce discomfort during the procedure. It can take 30 minutes or more to begin working, so timing matters. The artist applies it before treatment and allows time for it to take effect. Numbing can soften the sensation, but it doesn’t remove every feeling or guarantee a pain-free appointment.
People describe the sensation differently. Some notice pressure, scratching, or a light stinging feeling as the brow is treated. A commonly reported rating is 3 to 5 on a 1-to-10 pain scale, but your experience may differ. Skin sensitivity, stress, and how the area responds to treatment can affect comfort. If you feel sharp or increasing discomfort, tell the artist before continuing. Clear communication lets the artist pause and discuss the next step.
A microblading appointment in DC can take upward of 2 hours. The appointment includes more than the strokes themselves, so allow time for preparation, numbing, and the treatment. The exact timing depends on the work being done and the pace needed for careful application. Plan your schedule with enough flexibility rather than arranging another commitment immediately afterward.
When choosing a microblading artist in Washington, DC, look for clear credentials, healed brow examples, and an explanation of sanitation practices. Ask how numbing is incorporated and what aftercare instructions you’ll receive. A professional should explain the process plainly and discuss your comfort concerns before treatment. Review healed results, not just fresh brows, because healing changes their appearance.
Before your appointment, share relevant details about skin sensitivity and past reactions to topical products. Don’t apply numbing cream on your own unless the artist specifically instructs you; products and timing can affect the treatment plan. Agree on a simple signal for pausing, such as raising your hand, so you can communicate if the sensation becomes difficult. Ask what happens if the cream has not taken effect enough before the artist begins.
Numbing can support comfort, but it doesn’t replace careful technique or communication. A considered approach allows time for the cream to work, checks in during the procedure, and responds to your feedback. Knowing what topical numbing can and cannot do helps you approach the appointment with realistic expectations.
2. Does Microblading Hurt More Than a Regular Tattoo?
There isn’t one reliable pain ranking for every microblading appointment and regular tattoo. Both involve the skin, but technique, treatment area, session length, and numbing approach all shape the experience. Microblading focuses on the brows, where tenderness may feel concentrated in a small area. A tattoo may involve a different location and sensation, so someone else’s experience won’t predict yours.
After microblading, mild redness and tenderness around the brows commonly last 24 to 48 hours. The treated skin may also feel bruised or tender for about a day. Post-procedure soreness usually fades within a few hours, while sensitivity can remain noticeable afterward. For example, a brow may feel tender when facial expressions move the area, even after the initial soreness has eased.
Healing typically takes 1 to 2 weeks before the final result settles. During that period, the brows can crust and gradually fade. Their appearance can change as the skin heals, so the shade immediately after treatment isn’t the finished result. Avoid judging the outcome solely by the first few days; healing is part of how the final appearance develops.
Microblading aftercare means protecting the treated skin while it heals and following the artist’s instructions. Expect temporary redness, tenderness, crusting, and gradual fading across the 1-to-2-week healing period. Keep the area undisturbed and follow the specific care directions provided for your appointment.
Plan your calendar around the healing period. If you have photographs, travel, or an event coming up, consider whether visible redness or changing brow color could affect your plans. Brows may look darker during the first several days as the skin recovers. A flexible schedule makes it easier to follow aftercare without rushing back into activities that affect the brow area.
Choose a calm appointment day, and leave room afterward for uncomplicated recovery. If the brows feel tender, avoid unnecessary contact and follow the aftercare guidance given at the appointment. Don’t pick at crusting; disturbing healing skin can interfere with the process. If you’re comparing treatment details before deciding, review the microblading service details alongside the healing expectations.
Compared with a regular tattoo, microblading discomfort is best understood through its own technique and brow-focused healing process. The key planning points are the short-term tenderness, the 1-to-2-week settling period, and the temporary changes in color and texture. Knowing those stages helps you set realistic expectations for both comfort and downtime.
4. Ways a professional can help reduce discomfort before, during, and after microblading
A well-planned appointment starts with preparation, not the first brow stroke. Before treatment, a professional can review your skin-care routine, sensitivities, and comfort concerns to identify factors that may affect the appointment. For example, active exfoliants around the brows can make skin more sensitive. Share relevant details early so the artist can explain how to prepare and plan the session.
Pre-appointment guidance can also address caffeine and alcohol. Common advice is to avoid both for 24 to 48 hours before microblading. Tanning or sunbathing, brow waxing or plucking, and facial treatments may also need to be avoided beforehand. The suggested intervals differ: avoid tanning and brow hair removal for a few days, and facial treatments for a few weeks. A clear schedule helps you prepare without last-minute uncertainty.
Medication and skin-care instructions deserve particular care. Some preparation guidance advises avoiding ibuprofen, aspirin, and other NSAIDs for 48 hours before treatment. Retinol and exfoliating products on the brow area are also commonly addressed, with suggested pauses of at least one week. Because prescribed medication decisions depend on your health needs, don’t stop a medication without guidance from the professional who prescribed it. Tell the artist what you use, including topical products.
During the appointment, the professional can explain each stage before beginning and check in as the brows are treated. Agree on a simple pause signal, such as raising your hand. If a section feels more uncomfortable than expected, use the signal instead of silently enduring it. The artist can pause, reassess your comfort, and explain the next step. Clear communication helps address changing sensations.
Numbing cream is another part of comfort planning. Since it can take 30 minutes or more to begin working, the artist can allow time for it before treatment starts. Avoid applying a product independently; the professional should direct its use within the appointment plan. If the numbing effect feels insufficient, explain that before work continues. A pause gives both of you a chance to discuss comfort.
After treatment, discomfort management shifts to protecting the healing area. Follow the aftercare instructions provided for your brows, and avoid rubbing or picking at the skin. Tenderness may continue for about a day, while mild redness can last 24 to 48 hours. Plan a quieter schedule if brow sensitivity would make work, exercise, or social plans uncomfortable. Aftercare is part of the treatment, not an optional finishing step.
Preparation, communication, and aftercare all support a more considered experience. Share relevant medication and skin-care details, follow the professional’s pre-treatment guidance, and speak up during the appointment. These steps help the artist respond to your needs while keeping the focus on careful, controlled treatment.
4. Aftercare to help prevent complications
Common short-term effects include mild redness and tenderness around the brows. Crusting and gradual fading can occur over the following 1 to 2 weeks. These changes are part of the healing period, so the immediate appearance isn’t the final result. A key aftercare concern is disturbing the treated skin before it has settled.
Keep the treated area dry for the first 10 days after the procedure. Don’t touch, rub, pick, or wet the brows for a week to 10 days. Those instructions require attention during ordinary routines. For example, take care when washing your face so water doesn’t run over the treated area.
Avoid brow makeup for a week after treatment. Applying it can involve touching the area, so keep it off healing skin during that period. If you use complexion products nearby, apply them carefully without rubbing your brows. Follow the artist’s instructions if they give specific guidance for your routine.
Plan exercise and other activities around the recommendation to avoid sweating for a couple of weeks. A workout that leaves your forehead damp can make it harder to keep the brow area dry. Choose lower-sweat activities during this period, and return to your usual routine according to your aftercare instructions.
Follow the aftercare directions for any product applied to the brows. Some guidance recommends coconut oil twice a day until the area heals, while also advising that the treated area stay dry for the first 10 days. Because those instructions can be difficult to combine, follow the specific directions provided for your treatment rather than adding a product independently.
Avoid picking at crusting, even if the skin feels uneven as it heals. Crusting and fading can develop gradually over 1 to 2 weeks, so changes may not happen all at once. Let the area settle without rubbing or scratching. If you’re unsure how a step in your routine fits the instructions, pause that step and ask the professional who performed the treatment.
Arrange your schedule with the first 10 days in mind. Keep the brows protected from water, makeup, and unnecessary contact, and plan around the recommendation to avoid sweating for a couple of weeks. Mild redness and tenderness are common short-term effects, but worsening or unusual symptoms deserve prompt medical attention. Careful aftercare supports healing and helps you avoid disrupting the treated skin.
5. Contraindications and patch testing
Before microblading, discuss allergies, sensitivities, and previous reactions to cosmetics or topical products. Name the product and describe what happened, such as redness after an eyebrow tint or irritation from numbing cream. These details help the professional assess what may contact your skin and plan the appointment. Share relevant medical conditions and medications too, especially if they affect your skin or healing. Mention concerns even if they seem minor.
Your skin’s condition matters during the consultation. Point out irritation, a rash, a cut, or another change around your brows before treatment begins. The professional can review the area and explain whether proceeding fits the appointment plan. Recent chemical peels or other facial treatments are also useful context for discussing skin care. Give a clear timeline and identify the products or treatments involved.
A patch test involves applying a small amount of a relevant product to a limited area of skin, then observing the spot for a reaction. For microblading, ask how testing fits the plan for topical products or pigment. A patch test only considers the material and test area used. It doesn’t replace sharing your full history or discussing concerns before treatment.
Be specific about the test details. Note which product was used, where it was applied, and when any reaction appeared. For example, describe itching or visible irritation after a cosmetic product rather than saying only that you have “sensitive skin.” If a reaction occurs, tell the professional before the appointment proceeds. Don’t apply more products over the test area unless instructed.
Patch testing and screening for contraindications serve different purposes. Testing considers a reaction to a particular product, while a consultation gathers broader information about your health, skin, and past experiences. Neither discussion should be rushed. Make time to talk about allergies, medications, active irritation, and concerns about numbing products before microblading begins.
Be direct if you’re unsure about your history. If you can’t identify the product that caused irritation, describe how you used it and the symptoms you noticed. Bring the product name or ingredient label if available. This gives the professional more specific context than a general warning. For questions about a medication or medical condition, speak with the clinician who manages it.
For a considered appointment plan, schedule a microblading consultation and share relevant skin sensitivities and product reactions beforehand. Clear information supports a focused discussion of patch testing, preparation, and whether the planned treatment is appropriate for your circumstances.
Laveda Lash & Brow Boutique: Microblading
Laveda Lash & Brow Boutique offers microblading for those considering professionally shaped, defined brows. When you’re ready, discuss your brow goals, comfort concerns, skin sensitivities, and aftercare with the studio. A clear conversation helps you understand the process and decide whether microblading fits your preferences and schedule.
Bring questions about numbing, healing, and patch testing to your consultation. Sharing product reactions and relevant skin-care details helps make the discussion specific to you. If you’re still weighing your options, consider the healing period alongside the result you want.
Contact Laveda Lash & Brow Boutique to discuss microblading and your next steps.
Make Your Next Step Feel Considered
If you’re still weighing whether microblading is painful in DC, look beyond comparisons with tattooing. Consider the brow style you want, your comfort preferences, and whether you’re ready to follow professional guidance before and after treatment. A thoughtful conversation can help clarify your priorities and what feels right for you.
Bring your questions to the conversation. Discuss the look you hope to achieve, any sensitivities you want addressed, and what you need to understand before deciding. If microblading doesn’t suit your goals, a conversation can still help you consider another beauty service that fits your preferences.
For personalized guidance on microblading, contact Laveda Lash & Brow Boutique. Take the next step when you feel ready, with a clear sense of what you want to discuss.
Frequently Asked Questions
Does Microblading Hurt More Than a Regular Tattoo?
There’s no universal answer because sensation depends on the treatment area, technique, and personal sensitivity. Microblading focuses on the brows, while tattoo experiences vary by placement and style. If you’re comparing the two, consider the specific brow procedure rather than relying on someone else’s tattoo experience. In Washington, DC, discuss comfort concerns with the artist beforehand and clarify how pauses are handled.
Can I take painkillers before microblading?
Avoid ibuprofen, aspirin, and other NSAIDs for 48 hours before a microblading session, as commonly advised in preparation guidance. If you take prescribed medication, don’t stop or change it without advice from the clinician who manages it. Tell the artist what you take before treatment. That gives them context for discussing preparation and comfort without asking you to make medication decisions on your own.
Final Thoughts: Is Microblading Worth the Discomfort?
Microblading may feel worthwhile if its brow effect matches your preferences and you’re comfortable with the healing and maintenance involved. Results typically last 1 to 3 years, with periodic top-ups, so weigh that longer-term commitment against the appointment and aftercare. Consider your desired look, skin sensitivities, and schedule together. A realistic decision accounts for both the result you want and the care it requires.
How Does Numbing Cream Work for Microblading?
Topical numbing cream is applied to reduce sensation in the treatment area. It can take 30 minutes or more to begin working, so the artist plans for it before starting. Numbing can lessen discomfort without removing every sensation. Tell the professional if you’ve reacted to topical products before, and communicate during treatment if you need a pause or want to discuss how the area feels.
How long does the pain or soreness last after microblading?
Post-procedure soreness usually fades within a few hours, while mild redness and tenderness can last 24 to 48 hours. The area may feel tender to facial movement or incidental contact during that time. Keep to the aftercare instructions rather than rubbing the brows to assess them. If symptoms worsen or seem unusual, seek prompt medical attention instead of trying to manage them by touching the treated skin.
Is Microblading Your Eyebrows Painful?
Microblading can cause discomfort, but the intensity varies from person to person. Topical numbing is typically used, and some people describe pressure or scratching. If you’re asking whether microblading is painful in DC, your own sensitivity and the treatment experience matter more than a single rating. Share concerns beforehand, and speak up during the appointment if you need the artist to pause.
What About the Touch-Up Session: Is That More Painful?
A touch-up isn’t automatically more painful than the first appointment. Comfort depends on your sensitivity, the condition of the brow area, and the work needed. A touch-up is typically scheduled 4 to 8 weeks after the first appointment. Before it begins, discuss how your skin healed and whether you experienced discomfort previously. That context helps guide a conversation about numbing and pacing for the follow-up session.
What Does Microblading Feel Like?
People may describe the sensation as light scratching, pressure, or stinging across the brow area. The feeling can shift as the artist works on different sections, so it may not remain consistent throughout the appointment. Topical numbing can reduce sensation, but you may still notice the procedure. Agree on a pause signal before treatment and use it if you need a moment or want to communicate discomfort.
Comments